12 Sept 2013

Classroom layout and displays

Photos from the beginning of Term 3 2013:
Job list - pupil pictures are rotated weekly
Year Sixes have special school-wide jobs

My desk: by the front door, laptop runs the IWB
View along the windows
View along the IWB/whiteboard wall
View from front door, across classroom to cloakbay door - we have a mixture of options for seating -
pupils select a numbered counter when enter the room on Monday morning (corresponds to a workspace/seat/table)
and that is their 'base' space for the week.  They are allowed to move to other spots during the day eg when working with a partner or on an ipad, or if I want a guided group to be in a certain place.
Computer cupboard area
Marking shelf - pupils place books or completed work here for me to look at
Basket for the DIY (do-it-yourself) learning folders and resources; shelf for flag, stickers box, guided group resources.
Games cupboard (due for a paint-job!)
Literacy/spelling resources, atlases and large reference books.
Library corner
Inquiry display table, reporting books in boxes underneath
Inquiry wall - has question, key understandings, a relevant quote or two;
work or other material still to be added as inquiry progresses.
Personal learning goals display - wearing a motorbike helmet in honour of Burt Munro
Inside the computer cupboard
Guidelines on doors of computer cupboard


This lets me know who to respond to on their blog
School agreement for pupils using computers
A work in progress - poem of the week, current events
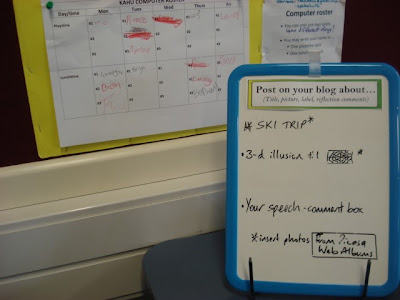
Suggestions board for what to blog about and a playtime/lunchtime computer roster
Bulldog clips attached to wall for displaying class-made publishing books.
Displaying the expectations of learning for writing.
Motivation for the Year Sixes towards the end of year prize-giving.
Wall shelves - homework books are kept each day in the empty space; modelling books to the right,
Bible in Schools books below, refill pads and handwriting cards,
maths text books at bottom - all within easy reach.
Maths equipment
As we have no desks we store our books for each subject in these bins.
The chairs get stacked at the end of the day.
We have some stools as an option.
Another version of stools.
Handwriting levels
Noise signal lights
Reward system - when board is full the dodecahedron dice (to 12) is rolled
and the winner chooses from the prize-box.
And for inappropriate behaviour...(steps two plus are hardly ever referred to thankfully!)
Guided groups on display
Low table, cushions are a seating option - due for paintjob too!
As we have no storage desks the pencil cases are kept in these trays;
everyone shares the rulers and glue-sticks.
The centre of the maths shelves/homework book shelves -
spelling and basic facts resources, literacy CDs, music CDs etc.
My personal collection of teaching resources, kept on shelves in the art bay.
More of my resources, on a higher shelf on other side of artbay.
More of my resources - the bits and pieces stuff!
Pupils can use these art supplies.
My everyday trolley - planning and resources for the week are easy to access.
Reward system - using obsolete library cards, points given for tidy handwriting as well as three points per day
as "work pay" for being at school.  Pupils can 'buy' from the shopping list.
My marking system for book work.
I use groups of three for cooperative tasks. Change each term.

7 Jul 2013

3-d designs 2013 - rolls and tubes

Aiming to use shading to create a 3-d effect! Two very striking optical illusion designs...

'3-d circles' - from my new favourite art ideas website called Our Art Lately and it was on THIS optical illusion artwork post that I found it.

I printed out some instructions and my pupils worked on their art as a reading/art activity for a DIY task. We  used crayons or colouring pencils for the colours rather than felts.

Here are some of the results from my Year 5 and 6 pupils: very important to get the shading right in the whiter blocks to get the effect.


We also found this activity from the blog Art With Mr E and enjoyed the effect that it creates! We used A3 cartridge paper and black vivid pens (with newspaper underneath to protect the tables) - draw one curved line side-to-side across the A3 paper, then place about 8 dots randomly-spaced along the curved line.

Next, use the vivid to join the dots with small curved lines.  Repeat the movement, being sure to run the pen right into the dot each time (to build up a dark shadow line between each tube). Keep going until sheet is full. Try to not let the lines cross over (the Mr E blog post has examples of what NOT to do).


Once the lines are created, select three or four coloured pencils and begin shading the segments of the 'tubes' - aim for about three shades of the colour within the segment - we coloured the section all over very lightly first, then pressed more firmly about a third of the way in from each side, then pressed even more firmly in the very corners of the segment, so we had a gradual build up of colour - it is important to shade side-to-side within the segment, not to run the pencil up and down or you might make edges or lines.


More examples to come!!